
Add a page
From the left side bar, hover on “Pages” and select “Add New” from the pop up. Input information on the page via content blocks.
Content blocks
The WordPress editor uses modular blocks to create content. This is handy because once a block is in place, you can easily move it up or down the page to reorder content. You can also create reusable blocks of content to use on other pages.
Add a new content block
To add a new block, you can either press ENTER or hover over the bottom of the block and click “Add Block” (a plus symbol) to see a list of commonly-used blocks.
Note: If you press “Browse all”, all of the content block types will appear in a right-hand column, including: heading, paragraph, list, table, video embed, Simple Alerts, Forms (PDFs), images, etc.
Change content block type
Hover over a block to bring up the toolbar. The button in the left corner shows you the type of block you’re looking at, and lets you change the existing block to another type. Mostly, you’ll be using Heading blocks, List blocks, and Paragraph blocks.
Move blocks
This function is actually a lot easier than it seems. When you point over a box and the blue outline appears, a set of arrows and 6 dots will also appear to the top right of the block. Click the up arrow to move the highlighted block 1 above or use the down arrow to move the block one below. You can also click and drag the set of dots to wherever you would like the box.
Embed (add) media
Adding media is a great way to spice up a page. Our WordPress theme has the capacity to introduce media from YouTube, Twitter, Facebook, Instagram, Spotify, Vimeo, Photobucket, and many other media platforms. You can watch our training video on embedding a YouTube Video, which will likely be the most common scenario.
You can also scroll through the block menu to the EMBEDS section, where you can find the most common embed blocks. In case you cannot find your preferred media service’s block, you could also use the EMBED URL block for a wide variety of media links.
If your video is saved as a file and not on YouTube, the process is similar. Scroll through the block library to find the MEDIA section, select Files, and select the video to upload.
Note: Make sure to always add a caption to the video, image, etc. because it is helpful for accessibility use by screen readers and search-engine optimization.
Format and create lists
You don’t have to make separate blocks for each paragraph. If you want to skip a line without creating a new block, hold SHIFT and press ENTER. This will keep all text within the same block.
To make a list, click Add a New Block and search for the List bock. Pressing enter will generate the next item on the list. You can also write your list without formatting in the Paragraph block, then select TRANSFORM TO in the menu bar.
If you don’t want a new list item, but instead want a subset of items, press enter to generate the next list item, then click the indent button on the toolbar to create the subset. You can then click on “convert to unordered list” to switch the subset to a bulleted list type.
Add a callout box
Callout boxes help important content stand out on the page. The OEC Website has a custom callout box that has been built specifically for OEC’s brand standards to align with the State of Connecticut statewide design system. Add the callout box by choosing “Callout” from the content block options. You can add a title and description, toggle on/off for the icon, or choose an icon from the icon library.
You can also decide whether you would like a horizontal callout box format, or a card callout box format. We recommend using the horizontal callout box for most cases, and if using cards, only using only two cards at a time.
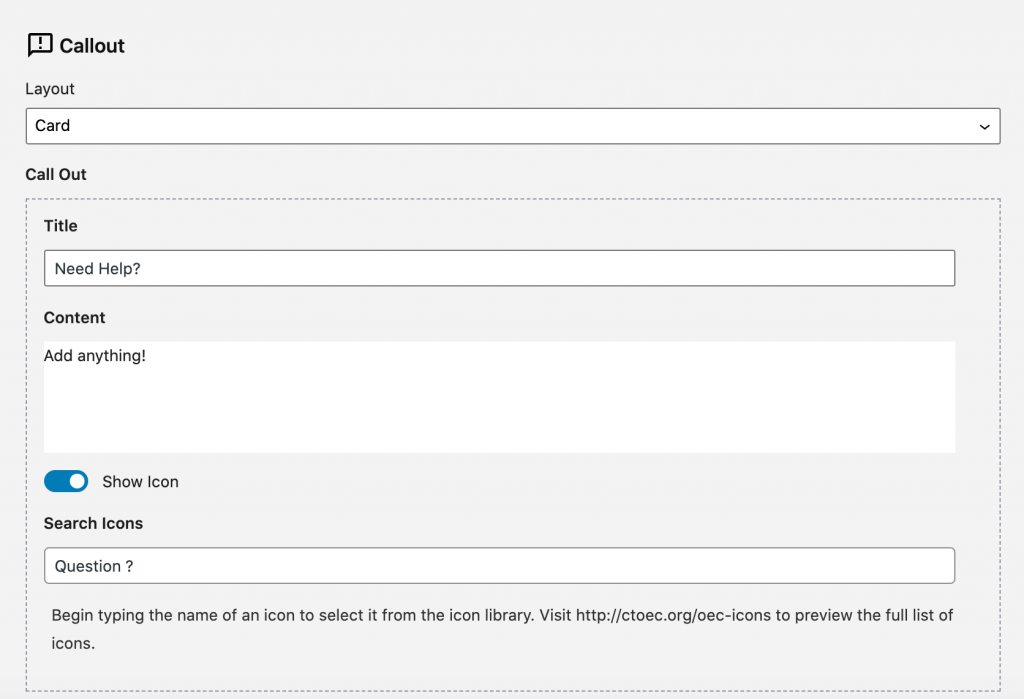
To find an icon, you will need to type the title of that icon into the search box, and select the correct icon from the list that pops up. You can find the title of each icon within the Icon Library Guide.
Add a table
A table should be used to display information in a tabular format. Only use the table builder when your content calls for it, not for styling purposes. This could confuse individuals who use screen readers. Additionally, always use a maximum of two rows. If that’s not possible, your content may be too complex.
For every table, make sure to include a header row for context — it’s a toggle in the right settings sidebar of the header builder block.